Local administrators on AAD Joined devices
Last Updated on
7 min readIn this article, I will explain how, one could attempt to manage the built-in administrators group, on an Azure AD Joined Windows 10 device, using an AAD Security Group.
Since the local Administrators group, does not support the addition of AAD born security groups, We will be using Intune, PowerShell, GraphAPI and Azure AD to accomplish this.
With these tools come great power, and even though this is a simplified use case, I will give some examples on more advanced use cases, at the end of the article.
The motivation for this article, has come from user voice, and a lot of people emailing me, asking for this. (Thank you! you are welcome guys/gals).
And remember: “Community work is not just for delinquents.” 😉
If you wish to read the official guidelines on How to manage the local administrators group on Azure AD joined devices, it can be found here: https://docs.microsoft.com/en-us/azure/active-directory/devices/assign-local-admin
The overview and the script.
Now, lets just quickly talk about what’s needed here, and then I will give you the script.. don’t TL;DR; me on this one…
This script does the following on a high level:
- Connects to Azure AD via the Graph API as a registered App.
- Gets the members of a predefined security group.
- (Optionally) Clean out ALL Azure AD users from the Administrators group.
- Adds security group members to the built-in Administrators group if they don’t already exists.
This script requires a few things:
- An App ID and key, that has been granted permissions to run as anyone in the org.
- The Tenant ID (Directory ID) of your AAD
- The ObjectID of the AAD Security Group, that you want to add users from.
- Assignment to some devices within Intune.
If you got all of that stuff under control, then by all means, go ahead and deploy the script with Windows Intune – assigning it to the devices you wish to use it on.
Otherwise, read on after the script link, on how to actually deploy it (The links above, can be used to jump to the different tasks you need to perform).
Oh and, you might want to save it to a file now, so you you have it handy, once we get to the upload part. 🙂
aad_controlled_localadmins.ps1 on GitHub
Getting things ready for the script (Pre-reqs).
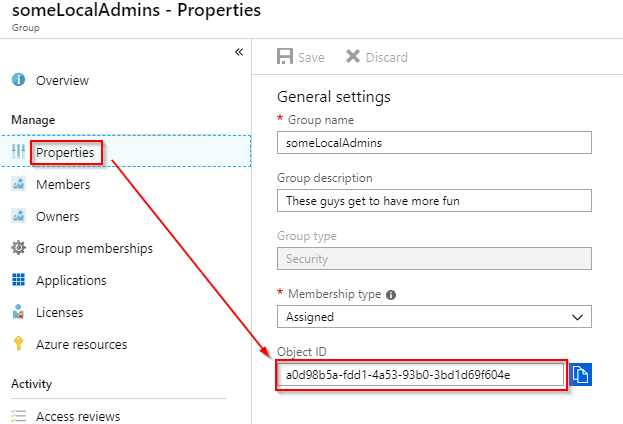
Getting the Azure Group Object ID
First we need to create a security group in Azure AD, that contains the users that we want added to the built-in Administrators group, on the devices we assign it to.
- Sign-in to your Azure tenant portal and open Azure Active Directory -> Groups, and create a new security group, and make sure to add one or more users to it!
- Get the groups Object ID, by viewing the properties of it.
- Add the groups Object ID to the script, in the “CONFIG” section.
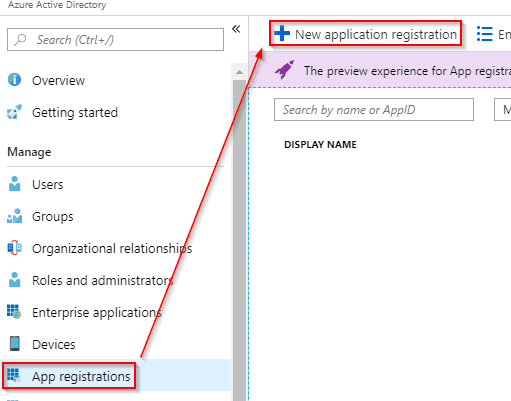
Registering an application, in order to gain API access for the powershell script.
If you don’t know how the basics of getting API access, via an app registration in Azure AD, then it’s about time bro!
Lets get to it!
(Don’t worry, we are doing the simplest form of app registration – Easy Peasy, Kanye is Jeezy.)
Go to your Azure Active Directory blade, in the Azure Portal, and click on “App Registrations” -> “New application registration”.
Now in the “Create” blade, fill in like this:
(The URL is just a placebo, as we won’t be using it, but is required to be filled).
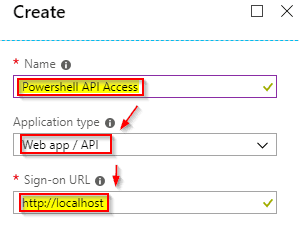
…and click on the blue “Create” button, at the bottom of the blade.
On the next blade that appears, you will immediately be presented with one of the things we need, namely the “Application ID”, copy that sucker and paste it into the CONFIG section of the PowerShell script.
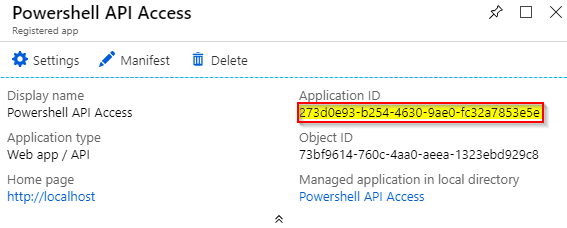
Now click the blue “Settings” gear icon.
Next we create a key to give our script access.
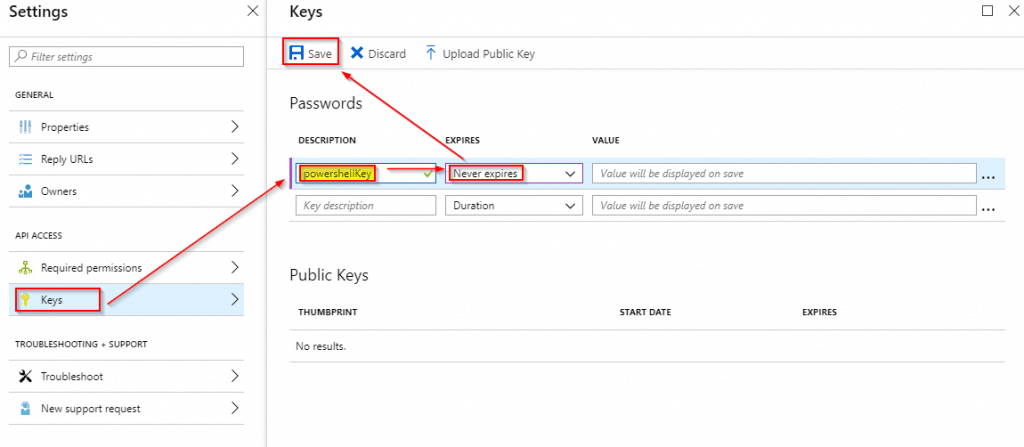
Click on “Keys“
Enter a description (important if you decide to change keys because it might have been compromised, so keep track of these!).
Choose and expiration date for the key (I choose never, so I don’t have to deal with any s**t in a few years, lol).
Notice that the key will only be shown upon saving – so click on “save” and copy paste the key into the CONFIG section of the script.
Now we need to assign the appropriate permission in Azure AD for the script…
Close the “Keys” blade, so you are back at the “Settings” blade.
Click on “Required Permissions”.
Take a close look – a lot is going on here:
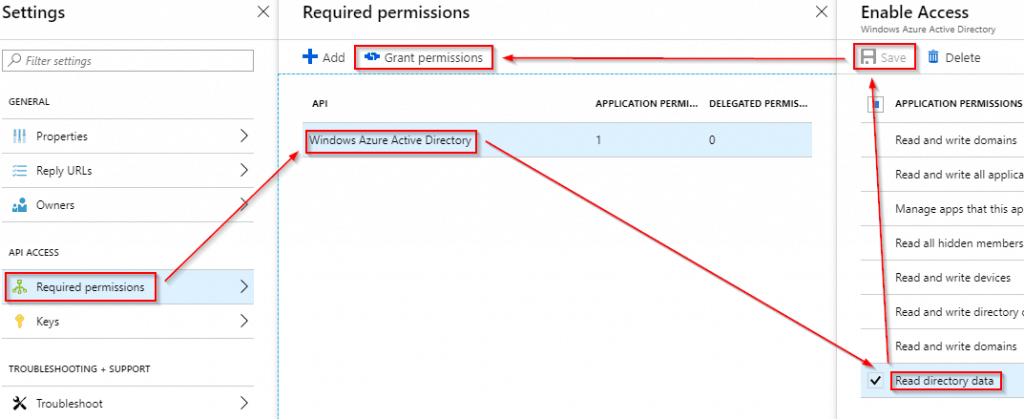
So first, we double click on “Windows Azure Active Directory”, which opens up the “Enable Access” blade.
Here we deselect any defaults, and just tick the box next to “Read Directory Data”, and click on “Save”.
After that ordeal, we click on “Grant permissions”, and accept that we are now granting the app full permission to access the data we are requesting.
Now you can close all the blades – this part is d o n e !
#phew
Getting the Tenant ID (Directory ID)
This might be the easiest thing in the world for some people, but here is how to find your tenant ID in Azure Active Directory.
Go to your Azure Active Directory portal – Open up the Azure Active Directory service from the lefthand menu – click “Properties”, and there you have it… Ready to be copied into the CONFIG section of the script.
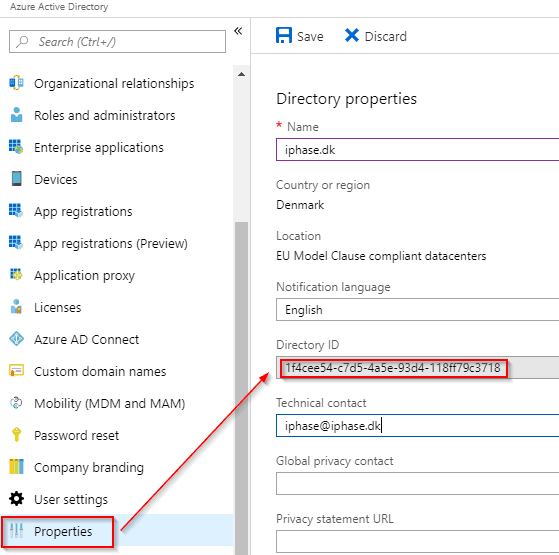
Yup! That’s all there is to it.
Now on to the final part!
Publishing the PowerShell script with Intune.
While signed-in to the Azure portal as your tenant, open “Intune”.
From the Intune portal, go to “Device Configuration” -> “PowerShell scripts” and click the blue “+ Add” button, to add the script.
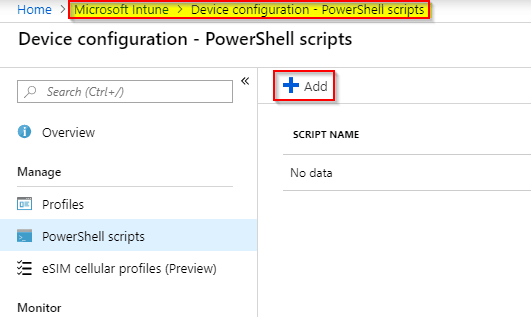
Now fill in a Name and Description, and select the script file to be uploaded.
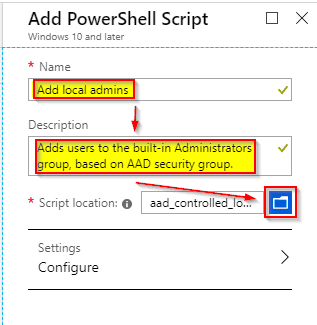
Afterwards go directly to the blue “Create” button at the bottom of the blade, as the default settings are fine.
You should be familiar with assigning the script to some devices, so this guide will not cover that in detail.
However, please consider scoping the devices with groups, instead of just adding the script to all devices (it’s best practice yo!).
Advanced use cases
For some more advance use cases, one could create multiple versions of the script, that source from different security groups.
This would allow you to assign different administrators, to a segregated list of devices.
The scenario could be one where local IT staff exists in branch offices, and they have no business handling devices not belonging to their branch.
To do this, you would create multiple PowerShell Device Configurations that each target a different security group. these would in turn be assigned to different device groups.
More could be done, but this was just one quick example…
Final Words
NB: The cons of adding any powershell script via Intune, is that it only runs once. So you will need to fix that by deleting the policy, and recreating it, if you have changes to the group membership.
I have another workaround for this, in my blog post here: https://www.iphase.dk/force-reload-intune-powershell-scripts/
ALSO: Read the script through, there are experimental features in there you might need!
As always, I welcome any ideas, script changes, remote work gigs, and dad jokes.
Hope you found this article useful, if so PLEASE @mention me or follow me on Twitter@michael_mardahl
Passwordless journey with FIDO2 – Part 1 – Getting started with security keys

Office Templates in the Cloud

Hacking Intune Management Extension
About Author
Michael Mardahl
Michael works as a Cloud Architect with APENTO in Denmark. Specializing in customer journeys from classic Infrastructure to Cloud consumption. He has been in the IT industry for more than 20 years, and has experience from a broad range of IT projects. When not at work, Michael enjoys the value of spending time with family and friends, and BLOG's passionately about Enterprise Mobility whenever he has time to spare.