Silent Configure Outlook with Intune
Last Updated on
8 min read
Intune is great for a lot of things, but is lacking some of the basic configuration options that Group Policies bring to the table.
UPDATE: Administrative Templates in Intune now make most Group Policy Templates available with a few clicks. Read more here: https://docs.microsoft.com/en-us/intune/administrative-templates-windows
But for some time now it has been possible to take almost any ADMX file, and ingest it into the Intune management engine.
This is however not for the faint of heart!
So it’s up to the community to share as many useful ADMX Ingestion / OMA-URI “conversions” as possible.
Being heavily inspired by Oliver Kieselbachs work in this area, I decided to embark on my own greenfield ADMX Ingestion, aiming at Outlook 2016/2019/365 silent configuration (first run only).
called ZeroConfigExchangeOnce and setting its value to 1.
But that leaves a lot to be wanted traceability wise in the devicemanagement portal.
So I started off by reading the official documentation on the subject, which btw is excellent!
I decided that I could do this (and so can you!) – So I headed on over to the download center, and got my self a fresh copy of the Office ADMX files, which you should also do now, if you want to be a fricking ADMX ingesting ninja!
If you want to stay here (please do), I have the Outlook ADMX (Outlk16.admx) file as a GIST in my Github repo.
Ok, so now let’s do this!
Creating an ADMX backed policy in Intune
With your confusing XML based ADMX file in hand, head on over to the device management portal, and create a shiny new device configuration policy.
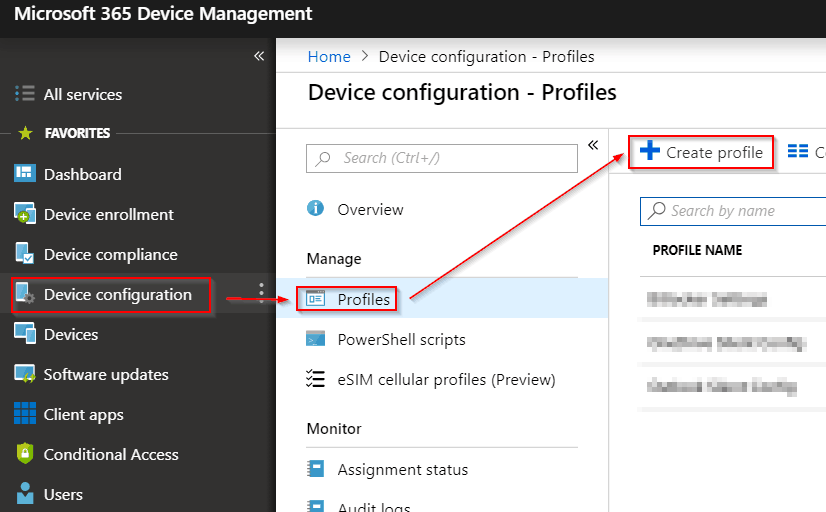
Steps: Click “Device configuration”. Click “Profiles”. Click “Create profile”.
Next!
In the appearing “Device configuration profile” Blade, fill out the fields in sequence like so:
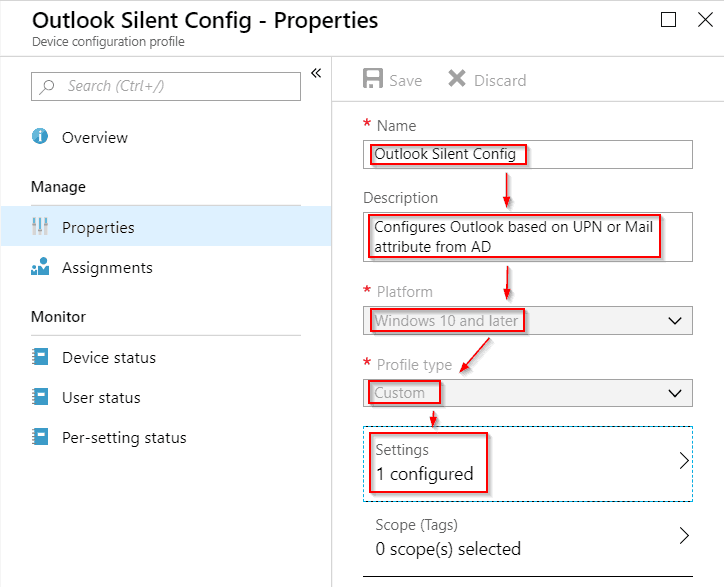
Name:
Outlook Silent Config

Description:
Configures Outlook based on UPN or Mail attribute from AD

Platform:
Windows 10 and later

Profile type:
Custom
Steps: Fill out with info from above. Click on “Settings” to begin the dirty work…
First part is easy, ingest the ADMX, by adding a custom OMA-URI.
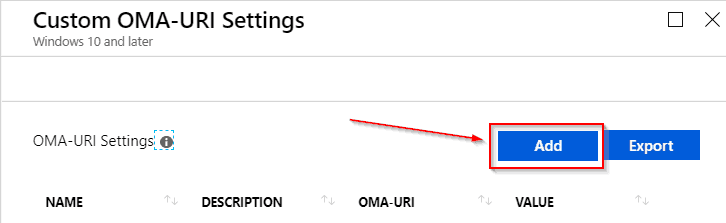
Steps: Click “Add”.
Next!
Ingesting the ADMX file
In the appearing “Edit Row” blade, fill out the fields in sequence like so:
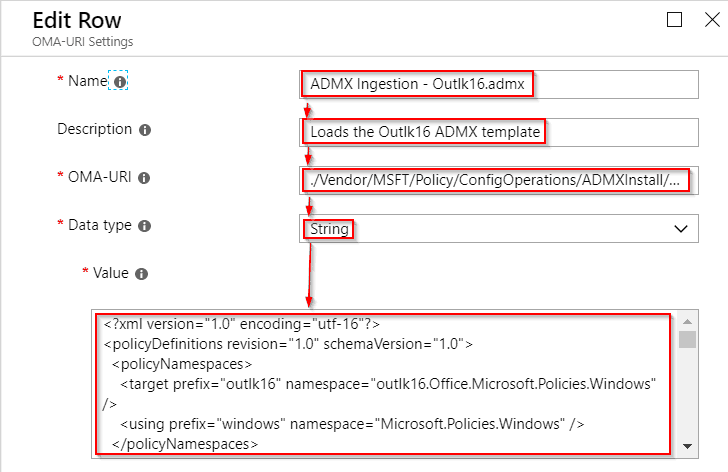
Name:
ADMX Ingestion - Outlk16.admx

Description:
Loads the Outlk16 ADMX template

OMA-URI:
./Vendor/MSFT/Policy/ConfigOperations/ADMXInstall/Outlk16/Policy/Outlk16Admx

Data type:
String

Value:
!!THIS IS WHERE YOU PASTE IN THE ENTIRE CONTENTS OF THE OUTLK16.ADMX FILE THAT YOU HAVE READY - DON'T FUDGE IT UP!!
Steps: Fill out with info from above. Click the blue “Ok” button at the bottom of the blade.
Now let’s take a short knowledge break!
(or skip to the next heading if you just want the juice!)
A few things to note about the OMA-URI…
Up until the ADMXInstall/ part, it’s just how it HAS to be. After that we have the Outlk16/ part, this is a custom app name, which could just as well be called myApp, but it’s important later on, so I choose to set it as the admx name for convenience (it shows up in the logs and other places).
The Policy/ part, defines the setting type, and since this is a Policy (as stated in the ADMX file), we leave it at that.
The last part Outlk16Admx, is the filename including it’s extension – this could be a fileUid also, and I can’t really tell if it plays a huge importance, as changing it makes no difference.
So /Outlk16/Policy/ is really the important bits to remember here, as they play an important role in using the settings in the ADMX file we are ingesting/installing.
Ok, lets continue…
Using the ingested ADMX
Now, lets add another OMA-URI by clicking the blue “Add” button at the top of the active blade.
Steps: Click “Add”.
Next!
Now we are ready to tell Intune how to use the settings in the ADMX file we just ingested.
In the appearing “Edit Row” blade, fill out the fields in sequence like so:
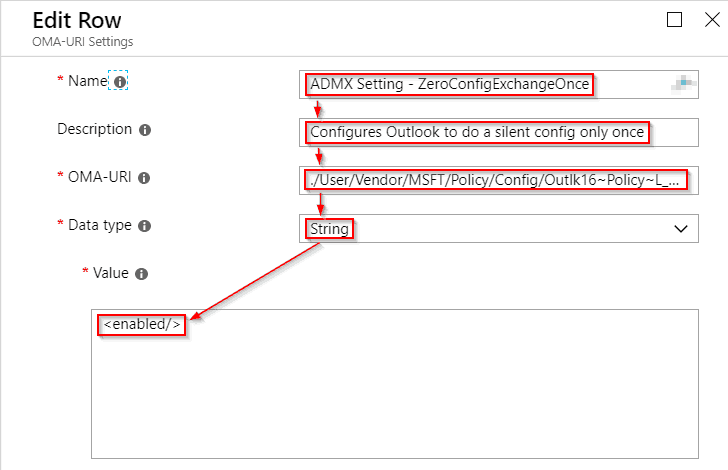
Name:
ADMX Setting - ZeroConfigExchangeOnce

Description:
Configures Outlook to do a silent config only once

OMA-URI:
./User/Vendor/MSFT/Policy/Config/Outlk16~Policy~L_MicrosoftOfficeOutlook~L_ToolsAccounts~L_Exchangesettings/L_AutomaticallyConfigureProfileBasedOnActiveOnce

Data type:
String

Value:
<enabled/>
Steps: Fill out with info from above. Click the blue “Ok” button at the bottom of the current AND next blade. Click on the blue “Save” disk icon.
THAT’S IT! – Don’t forget to assign the policy to some users/devices!
“But Wait! How the hell did you come up with that whole fudged-up OMA-URI?“, you ask…
Time for more knowledge sharing (hell yeah!)
Well that was also my question when I was reading other blogs and documentation.
Turns out, it’s not really that hard to gather what to write there in order to hit a specific setting within the Group Policy…
The first part is easy ./User/, this indicates that this is a user policy, which you can tell within the ADMX XML, if you search for the setting you want to hit (typically a registry key of some sort).
Here you would find the value class=“user” in the <policy …> tag area. Had it said machine instead, you would have to put in ./Device/ instead of ./User/.
Next up we have /Vendor/MSFT/Policy/Config/ which is always what you put in, according to my experience, and the documentation I have read, so let’s keep it that way (a part of the OMA-URI standard I guess).
Then comes the part where one might get lost/confused/blind/what?…
/Outlk16~Policy~L_MicrosoftOfficeOutlook~L_ToolsAccounts~L_Exchangesettings/L_AutomaticallyConfigureProfileBasedOnActiveOnce
Looks nasty… But there is a very logical structure to this, and the map is in the OMA-URI that we used to ingest the ADMX with, and the original XML of the ADMX file.
Remember the OMA-URI for the AMDX ingestion?
I told you that a few parts of it was important, right?
Well imagine replacing “~” with a “/” in the above OMA-URI – it would look something like this:
/Outlk16/Policy/L_MicrosoftOfficeOutlook/L_ToolsAccounts/L_Exchangesettings/L_AutomaticallyConfigureProfileBasedOnActiveOnce
Notice, the first part is ripped straight out of the OMA-URI, used to ingest the ADMX! Easy to understand… Maybe.
The next part is like a tree structure, that you “traverse in reverse” (hmm.. that has a nice ring to it.), starting with the actual name of the policy we want to configure, then adding a /, and seperating the policy category names with ~.
So let’s imagine that we want to enable a certain setting from our ADMX – looking at the XML code in notepad (or an actual XML viewer), we do a search for the setting / registry key.
We get a hit on this line:
<policy name=”L_AutomaticallyConfigureProfileBasedOnActiveOnce” class=“User” displayName=“$(string.L_AutomaticallyConfigureProfileBasedOnActiveOnce)” explainText=“$(string.L_AutomaticallyConfigureProfileBasedOnActiveOnceExplain)” key=“software\policies\microsoft\office\16.0\outlook\autodiscover” valueName=”zeroconfigexchangeonce“>
The value of “name” in the policy tag, is the last part of our OMA-URI.
To get the value of the path that precedes it, we need to look at the next line for the parent category, which we will note and follow all the way to the main category.
<parentCategory ref=”L_Exchangesettings” />
Go back a few lines and look at the OMA-URI and see where L_Exchangesettings fit’s in – begining to make sense now?
To get the next category name to put in, let’s scroll all the way up to the top of our XML code, and find the <categories> tag.
Here we will look for L_Exchangesettings category, and find that it also has a parent category, called L_ToolsAccounts, which also needs to be in the OMA-URI string (again, go up a few lines to the OMA-URI, and see where L_ToolsAccounts fit’s in).
And yet again we look a bit further to find that L_ToolsAccounts, ALSO has a parent category named L_MicrosoftOfficeOutlook! (When will it end!?)..
Again, we put L_MicrosoftOfficeOutlook into the OMA-URI and go search for it further up the category ladder…
FINALLY we discover that L_MicrosoftOfficeOutlook is the main category (since it’s category tag is closed with a “/”).
So now we have the complete OMA-URI:
./User/Vendor/MSFT/Policy/Config/Outlk16~Policy~L_MicrosoftOfficeOutlook~L_ToolsAccounts~L_Exchangesettings/L_AutomaticallyConfigureProfileBasedOnActiveOnce
Ready for use in our custom policy!
Thanks for reading!
I really hope this helps you get a better grasp, on ingesting ADMX templates and using them in a policy.
Please feel free to reach out on twitter (@michael_mardahl) – Questions/feedback/likes/follows are very much appreciated!

Easy automapping “Office 365 Groups” drives with OneDrive
Passwordless journey with FIDO2 – Part 2 – Usage experiences

Hacking Intune Management Extension
About Author
Michael Mardahl
Michael works as a Cloud Architect with APENTO in Denmark. Specializing in customer journeys from classic Infrastructure to Cloud consumption. He has been in the IT industry for more than 20 years, and has experience from a broad range of IT projects. When not at work, Michael enjoys the value of spending time with family and friends, and BLOG's passionately about Enterprise Mobility whenever he has time to spare.